Happy 4th of July!
Right now I'm missing my family in Michigan because we usually have a huge party that lasts all day/night with tons of beer, food, and fireworks. I LOVE family parties!
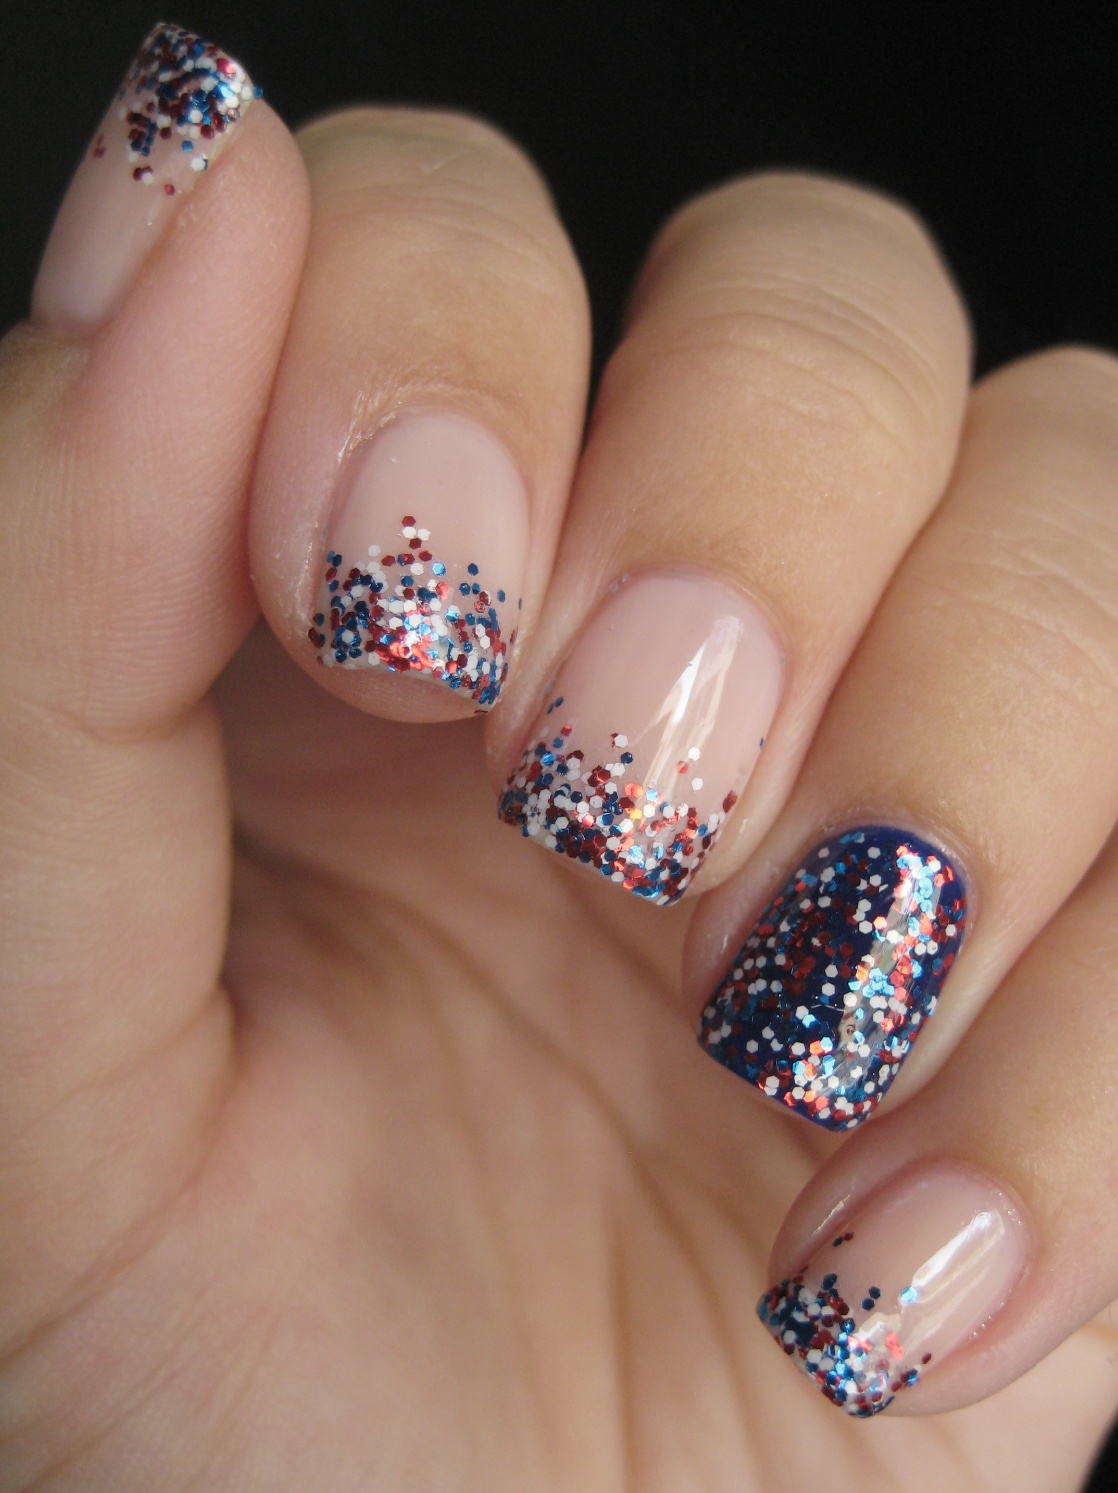
These are the nails I did to celebrate (I DO get to go over to my grandparent's and have a little party with them and my aunt and uncle). I used Revlon Royal for my left ring finger, China Glaze Phat Santa for my right finger and OPI You Callin' Me a Lyre? for the base on the rest. Then I layered All That Glitters Glitter Glory over the ring fingers and sponged it on in a gradient French over the others. It is very easy to apply with the brush, but I had a little trouble sponging it. I do love the result, though!
I bought Revlon Royal in a drugstore a few months ago, so I think it's readily available. Phat Santa was part of the China Glaze 2010 Christmas collection, but there are a lot of red creme/jellies like it. Glitter Glory was purchased from the All That Glitters Etsy shop, but it doesn't seem to be in stock at the moment. Hopefully it will return!
Showing posts with label funky French. Show all posts
Wednesday, July 4, 2012
Wednesday, December 14, 2011
The 12 Days of Christmas Nails: Day 6 - Gold Gradient
This is one of my favorites so far from my 12 Days of Christmas Nails. It's a simple French gradient made with OPI's Bring on the Bling.
Bring on the Bling has always been one of my most favorite polishes. It's an awesome gold glitter with tons of multicolor glitter as well, and we all know how I love gold glitter. I feel like I've done this before, but I don't think I have - I've only gone it over red or just straight gold French tips (both shown here). I actually did put a simple French tip in Orly Luxe underneath the glitter so I didn't have any bald spots, but I don't really know if it was necessary. However, Liquid Palisade helps ENORMOUSLY on cleanup if you put it on the edges of your finger under the tip (since it's easy to accidentally sponge some glitter there).
So I have a confession. Some of these "12 Days of Christmas Nails" manicures are really only "swatches" (only four of my fingers are actually painted), like the present one yesterday. And I started this one off the same way. When I was sponging on the gold, it looked really dull and not very, so I figured "eh, another dud... I'll just take some pictures then move on to the next thing." Well, in this case I ended up putting on the top coat and my whole opinion changed and I put it on all the rest of my fingers for a full manicure!
Oh, I also wanted to share something with you. I got an email from a skin care company in Canada called ASK Cosmetics that's hosting a huge giveaway (their entire line!). If you want, you can check out all of the details and guidelines for entering on their facebook page here: www.facebook.com/askcosmetics. It runs until Dec 22nd.
10 - Pinky Promise sponged with OPI Bring on the Bling
Bring on the Bling has always been one of my most favorite polishes. It's an awesome gold glitter with tons of multicolor glitter as well, and we all know how I love gold glitter. I feel like I've done this before, but I don't think I have - I've only gone it over red or just straight gold French tips (both shown here). I actually did put a simple French tip in Orly Luxe underneath the glitter so I didn't have any bald spots, but I don't really know if it was necessary. However, Liquid Palisade helps ENORMOUSLY on cleanup if you put it on the edges of your finger under the tip (since it's easy to accidentally sponge some glitter there).
So I have a confession. Some of these "12 Days of Christmas Nails" manicures are really only "swatches" (only four of my fingers are actually painted), like the present one yesterday. And I started this one off the same way. When I was sponging on the gold, it looked really dull and not very, so I figured "eh, another dud... I'll just take some pictures then move on to the next thing." Well, in this case I ended up putting on the top coat and my whole opinion changed and I put it on all the rest of my fingers for a full manicure!
Oh, I also wanted to share something with you. I got an email from a skin care company in Canada called ASK Cosmetics that's hosting a huge giveaway (their entire line!). If you want, you can check out all of the details and guidelines for entering on their facebook page here: www.facebook.com/askcosmetics. It runs until Dec 22nd.
Monday, December 12, 2011
The 12 Days of Christmas Nails: Day 4 - Red and Green Matte
Time for the fourth holiday manicure of the season! Remember to check out all of Sammy's here - she has more intricate nail art ones than I do, and they are AWESOME!
Some people say the "every other finger" type of manicure is one you'd do only as a kid, but I love the combination of red and green too much and had to try it with my Zoya Matte polishes.
Btw, I forgot to mention that the reason I hadn't posted in a week was because I was in Hawaii! I'd never been there before, and it was a blast! However, while we were there, it just didn't feel like the Christmas season, so I'm glad to be back and feeling the holidays once more. Anyway, I'm going to be playing catch-up a little more to get my 12 holiday manicures by Christmas!
Some people say the "every other finger" type of manicure is one you'd do only as a kid, but I love the combination of red and green too much and had to try it with my Zoya Matte polishes.
Zoya Veruschka and Zoya Posh
Simple, but pretty, I think. I love these two matte colors, and together it's just the epitome of Christmas. both are really rich and deep, and I think the matte finish tones down the tacky "alternating colors" manicure.
For a twist, I decided to put some shiny French tips on with my Zoya Armour top coat. It's not quite as shiny as some of my quick dry polishes, so I would probably use one of those next time I tried this. Also, I would have liked the tips to be skinnier.
Btw, I forgot to mention that the reason I hadn't posted in a week was because I was in Hawaii! I'd never been there before, and it was a blast! However, while we were there, it just didn't feel like the Christmas season, so I'm glad to be back and feeling the holidays once more. Anyway, I'm going to be playing catch-up a little more to get my 12 holiday manicures by Christmas!
Friday, November 18, 2011
N.NAIL Water Decals French Tip Nail Art- WDB069
Today I have for you some French tip water decals from KKcenterhk. Even though they are flowery, they feel really "fall" to me. Check out this awesome design (N.NAIL-WDB069):
Unfortunately, I had a bit of trouble with application. I think it may take me a few times to get the hang of water decals like this. For some reason, when I tried to file off the ends they ended up kind of ragged, so I tried to put topcoat on first before I filed the extra off... that didn't really work either. Also, the Seche Vite top coat I put on smeared the decals. I was really surprised about this because Seche Vite rarely ever smears polish, even if it's wet, and these were dry. I imagine there are topcoats that would work with these decals, just like there are topcoats that work over foils while others don't. I'm glad I only used a few of them for this swatch so I can try it again with the ten that are left on the little sheet. Hopefully I'll get a little better results with a second try.
These are available on KKcenterhk's site here along with many other nail art decals. I'd love to try some foil ones in the future!
Friday, January 14, 2011
Funky Half Moon
I came up with this idea just this morning and figured I'd wait to try it until the China Glaze Anchor's Away collection came out (for the navy and the red). As you can see, I didn't make it that long before trying it out.

I used Sally Hansen Xtreme Wear White On for the base (plus a coat of SV), then used Liquid Palisade to form the half moons and just painted over with RBL Dead Calm (navy), and OPI Monsooner of Later (red... I know it looks orange here, but it is a bright orange-red in person). One note about Liquid Palisade. It's pretty awesome, but make sure you give yourself an extra "tail" with which to pull it off once you've painted over it, and probably pull it off with tweezers (I didn't do either and got blue and red all over my other hand's fingers...). After I let it dry just a bit, I dotted White On in little dots (freehand with a dotting tool).
I like this one, but it takes awhile and I don't think I have the patience to complete the design on my other hand as well. I think it looks sort of nautical, or like a polka-dotted dress.
What does this design remind you of? Have you tried/do you like the half-moon manicures?
Tuesday, December 14, 2010
Some Holiday Manicures for the Festive Fingers Contest
After reading about Nicole by OPI's festive Fingers contest, I REALLY wanted to find the perfect holiday mani to submit. Here are a couple that I really like:


This is China Glaze Mommy Kissing Santa with Orly Hair Band as a glitter gradient on the tips.

This was the beginning of the following manicure - gold French tips done with OPI Glitzerland. Then I stamped the holly leaves in Jolly Holly using a Bundle Monster plate and dotted the berries first in OPI Royal Rajah Ruby then in China Glaze Red Pearl.

Which one is your favorite and which one should I submit to the festive fingers contest? Help me decide!
Sunday, December 5, 2010
Black Lace French Mani

I decided I really like some of the Konad designs I've seen, but I'm not very good at it, so I should practice. Again, inspired by Chloe, I tried to make a similar mani to her Lace Funky French Mani. I loved the Konad design she used, but I don't have that plate, so I had to use a different one. This one is really fun to wear, and I'm definitely going to try more Konad and Scotch tape mani's soon!
Saturday, December 4, 2010
Black French Mani
Today's manicure is inspired by Chloe from Chloe's Nails. She does some amazing designs using scotch tape, including awesome French mani's. It looked simple enough, but I'd never had much luck with tape before. She provides some great tips on how to use tape to create lines and shapes in a manicure. This one came out ok, but I'm sure it just takes some practice!


I used 10 in Pinky Promise (415) (can be found at CVS) with Wet'n'Wild Black Creme (most opaque black creme EVER!). Isn't it awesome?! I'm dying to try her patchwork mani next! I want to try a holiday one, but don't know which colors to use... I'm thinking green and chrome gold and something else... maybe gold glitter?
Do you like French manicures that utilize different colors? Have you ever used Scotch tape for nicely defined lines?
Monday, October 11, 2010
Halloween NOTD and Nfu-Oh giveaway!
Since it's October now, I'm getting super excited for Halloween, which is my favorite holiday!! I found a picture of a manicure like this a while back and wanted to replicate it, but it didn't turn out as well as I'd hoped...
Bear with me that I had to photograph my right hand for this one (which is surprisingly awkward and difficult!) because my Little Bird decided to wreck on of my nails on my left hand. Also, I had my left ring finger nail tear WAY too far down, so I can't clip and/or file it off. I'm in the process of finding a way to repair it; I tried Orly Nail Rescue, which seems to be fine, but I may put a thin layer of clear acrylic over it until it grows out enough to file it down. Anyway, please ignore the ugly bump on my middle finger that comes from writing too many notes in my aerospace classes!


Bear with me that I had to photograph my right hand for this one (which is surprisingly awkward and difficult!) because my Little Bird decided to wreck on of my nails on my left hand. Also, I had my left ring finger nail tear WAY too far down, so I can't clip and/or file it off. I'm in the process of finding a way to repair it; I tried Orly Nail Rescue, which seems to be fine, but I may put a thin layer of clear acrylic over it until it grows out enough to file it down. Anyway, please ignore the ugly bump on my middle finger that comes from writing too many notes in my aerospace classes!


China Glaze Marmalade & Art Club black striping polish
I used China Glaze Marmalade for the chevrons on the tips, then an Art Club black striping polish. For some reason, when I put Poshe topcoat on it, it pulled the black!! It looked kinda cool, but I would have preferred it to stay where I put it... :o)
I have some of the OPI Burlesque glitters and a few of the China Glaze Holiday 2010 collection coming from Transdesign.com sometime this week, so hopefully I will have come swatches for you soon!
Oh, and Michelle from The Lacquer Files is having a giveaway of the awesome Nfu-Oh 51! Such an awesome color! Check out her swatches and enter the giveaway here!
Subscribe to:
Posts (Atom)